Zoom: How to Secure Your Zoom Sessions
Enable Security Features
To enable these security features in your Zoom account, go to https://cuny.zoom.us, click on Sign In

Enter your CUNY Login Credentials (ie: John.Doe89@login.cuny.edu) at the CUNY Web Applications Login page
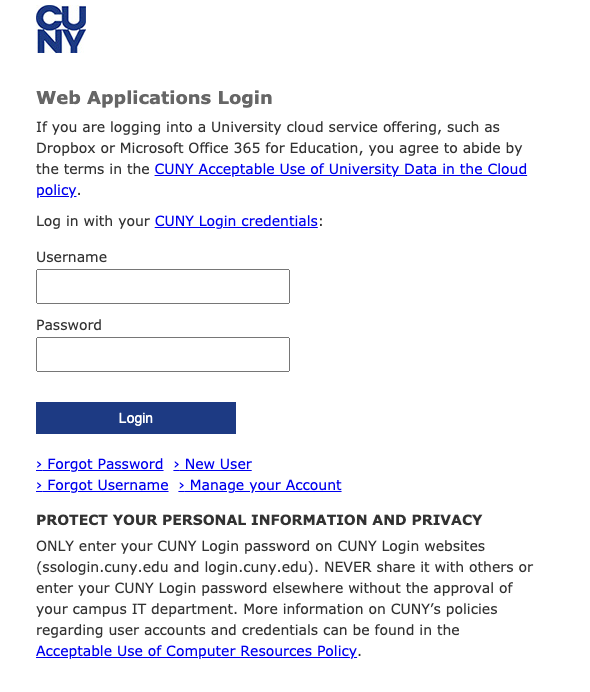
Note: If you have any difficulty logging in, please contact ITS by creating a ticket at https://support.qc.cuny.edu or send an email to support@qc.cuny.edu
After you have logged into your Zoom:
1. Click “Settings” on the left sidebar.
2. Click “Security.”
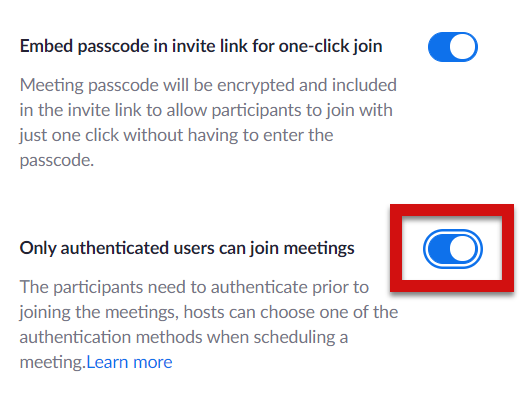
Require users to authenticate
How to require users to authenticate
Once you are in “Security” (see above):
1. Scroll down to a setting called “Only authenticated users can join meetings.”
2. Slide the button to the right so it turns blue (if it is already blue, it has already been enabled).
Passwords, Waiting Room and Locking the Room
Zoom requires users to enable at least one security feature: “Password” and/or “Waiting Room.” These security features can be set in the web interface or while scheduling the meeting itself.
A Password is an additional security feature that prevents a bad actor from gaining access to your Zoom session by having a computer “guess” the randomly generated Zoom link. However, if the generated Zoom password for your meeting is shared with a “bad actor” by a student, this will not prevent Zoom bombing. Passwords are an important security feature but cannot be relied on as the sole means of securing your Zoom meetings.
The Waiting Room is a feature that allows you to see who is requesting access to the meeting before granting them access. The Waiting Room has several advantages and disadvantages as a security feature. While the waiting room can stop a “bad actor” from accessing the meeting, it requires you to continuously monitor the Waiting Room to admit attendees throughout the Zoom meeting, which is both distracting and creates concentration difficulties for you as the host. In addition, Zoom bombers in the past have easily duplicated legitimate student’s names to illicitly gain access to the Zoom meeting.
Web Interface: Enable the Waiting Room and Passcode
Move the “Waiting Room” and “Require a Passcode when scheduling new meetings” toggles/buttons to the right until they turn blue. If these toggles/buttons are already blue, the Waiting Room and Passcode are already enabled.
Desktop App: Enable Passcode and Waiting Room
Under “Schedule Meeting”
1. Enable the Passcode option by checking the box and enter a passcode in the field.
2. Enable the Waiting Room option by checking the box.
Locking the Zoom Session
The Zoom session can be locked while in progress, preventing any additional users from accessing the class. After the “lock” is enabled, any additional attempts to access the session will automatically be rejected. This can prevent bad actors, but it also means legitimate students who have technical difficulties in the middle of the session or lose connection will be unable to rejoin. It is for this reason we don’t recommend enabling this feature unless you have significant issues with Zoom bombing. This feature can only be enabled once the Zoom class is in progress.
1. To Lock the room, click “Security” on the Zoom control panel (usually located at the toolbar at the bottom Zoom screen)
2. Click “Lock Meeting” in the resulting pop-up menu.
Please use a combination of the security measures identified above. Please bear in mind that none of these features individually will prevent Zoom problems in their entirety. No matter how secure you aim to be, there will be people who try to circumvent your efforts. These security measures highlighted in the instructions above, especially requiring users to authenticate through their login in zoom will significantly reduce Zoom meeting issues and assist you in identifying the responsible party should meeting issues occur.
Please follow the instructions below that provide the procedures for reporting a Zoom incident.
Reporting Zoom Bombing & How to report Zoom bombing
If you encounter a Zoom bomber during your class, you can remove them from the session and “lock” the room so they are unable to reenter. Be aware that if a student has an issue and needs to get back in the lock will prevent them from doing so. Make sure a reentry protocol is established (ie: you will have your email open if a student needs to contact you for class issues) prior to the Zoom meeting.
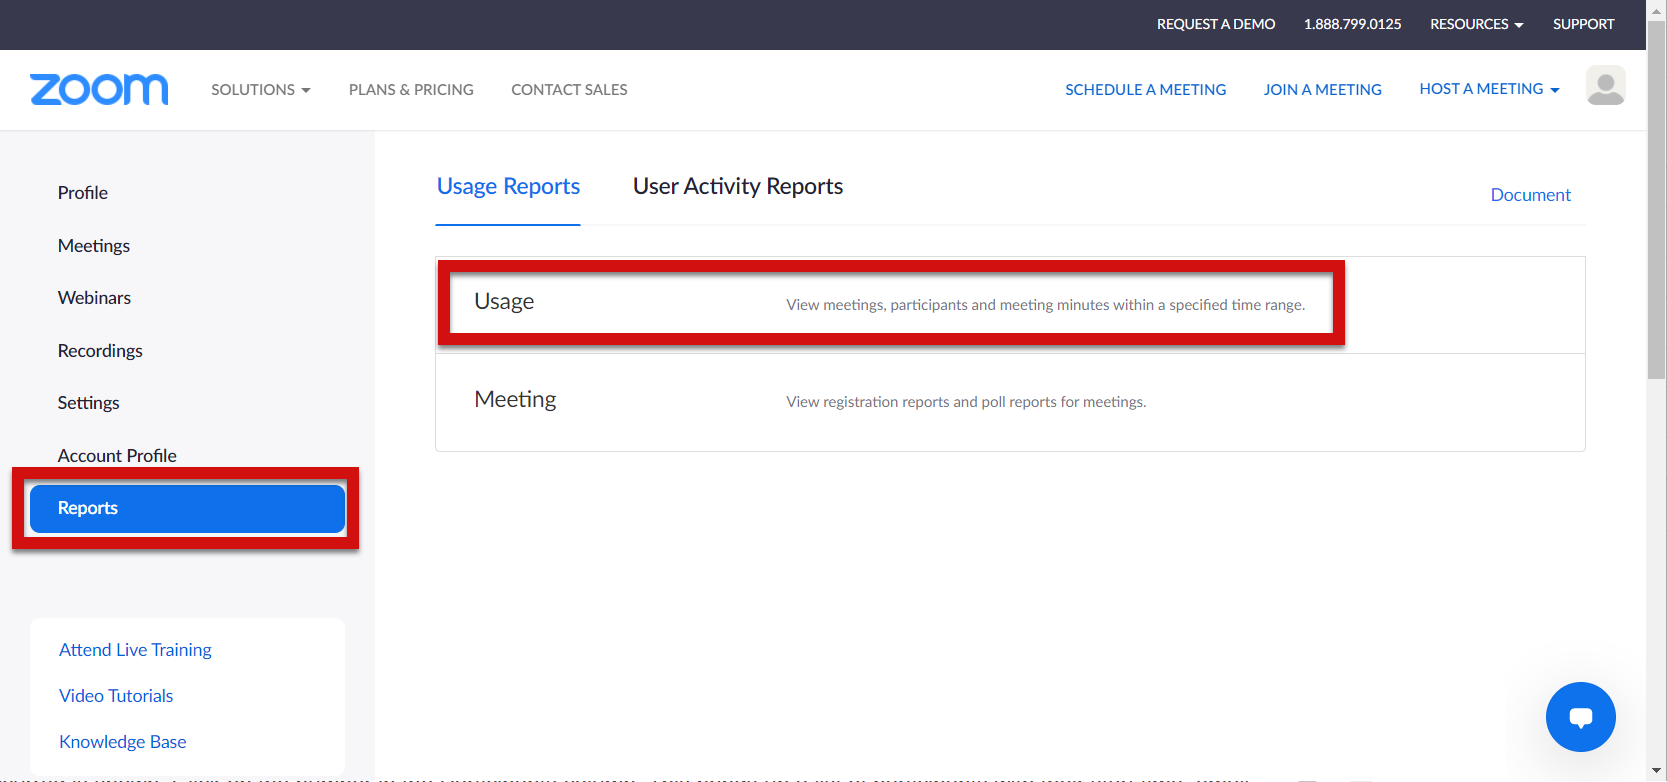
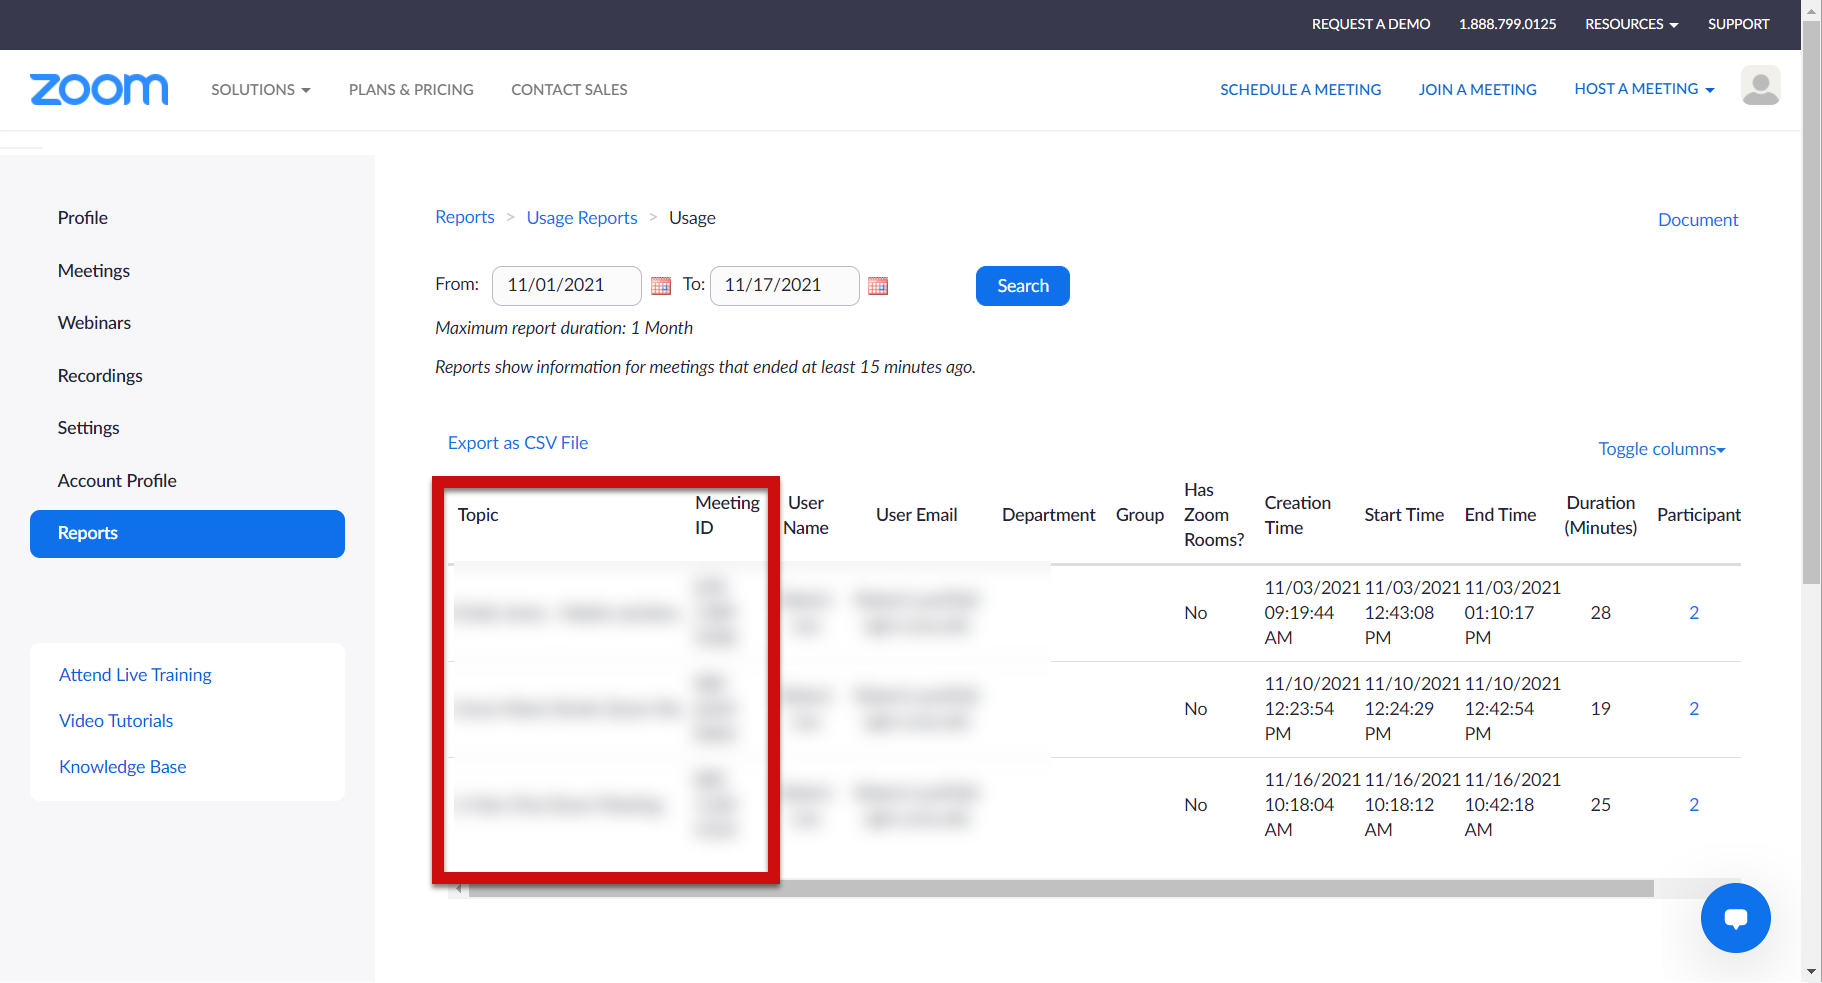
Document the time, name, and whatever other information you have on the “bad actor “including the disruptive nature of their actions. You can retrieve detailed information on all users in your session in your cuny.zoom.us site.
1.Click on Reports in the left side menu
Click on Usage under Usage Reports->Usage.
2. Adjust the date range settings so that the date the incident occurred is shown then click Search.
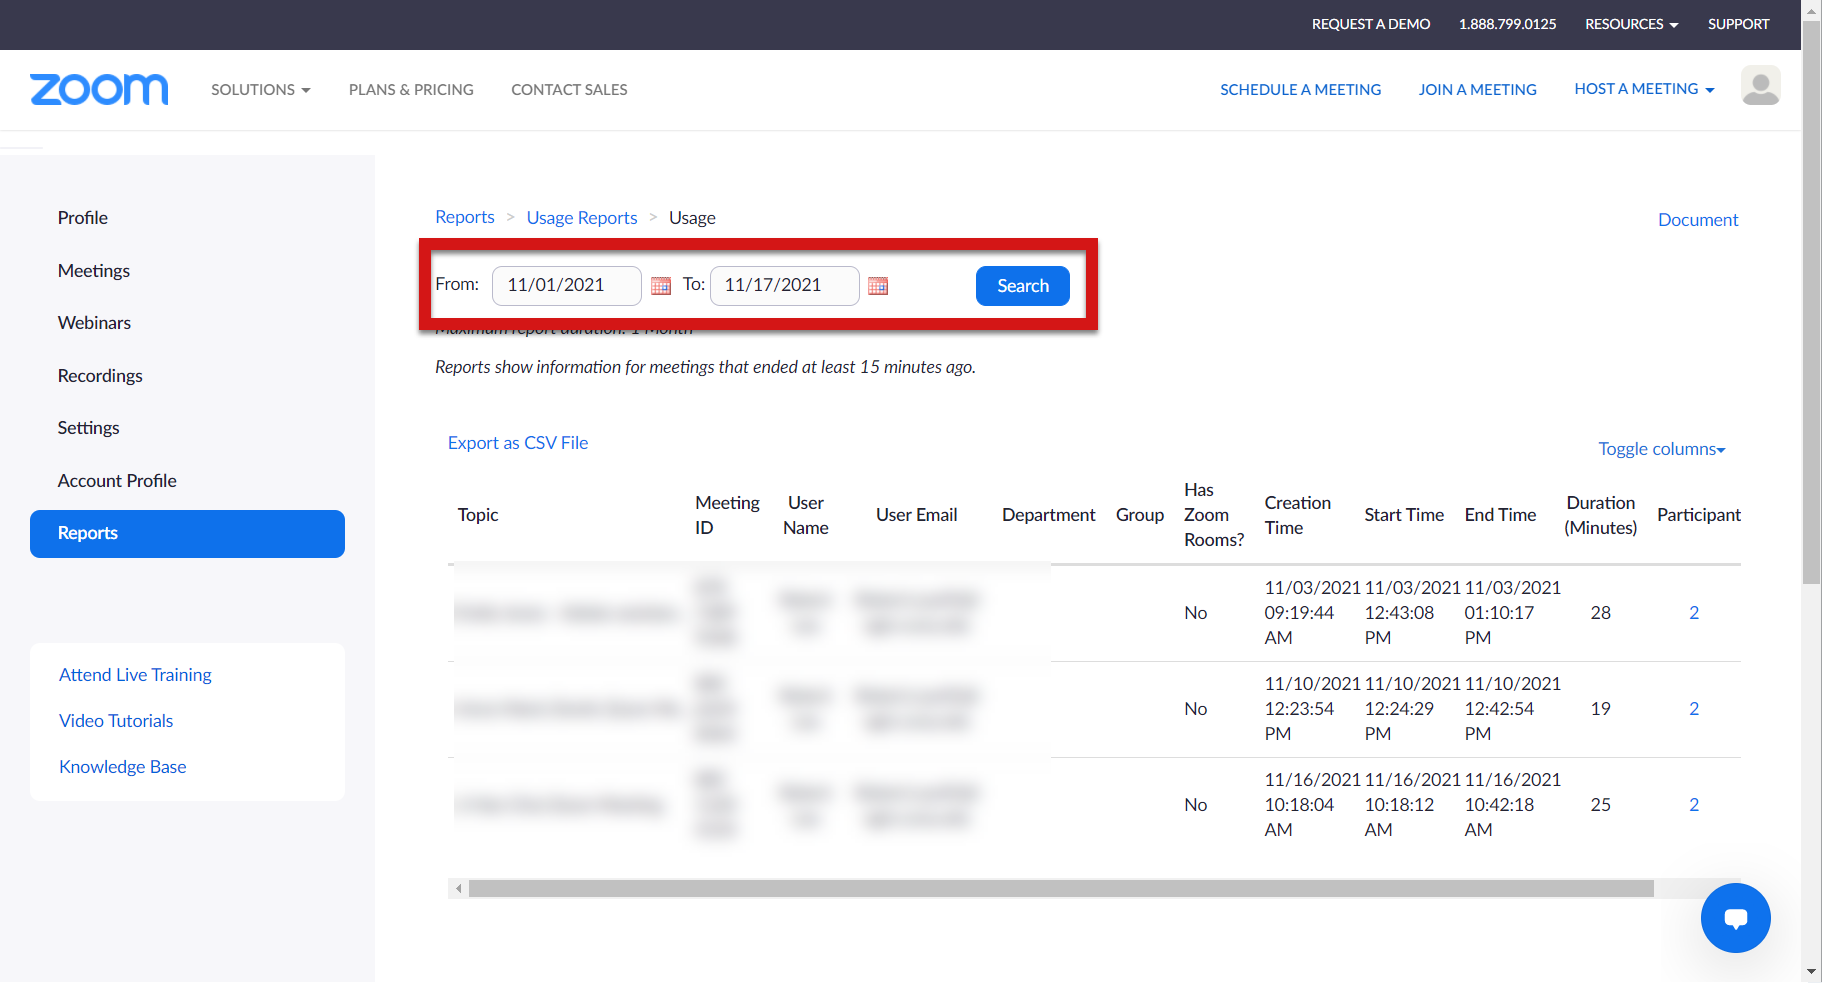
3. Find the meeting where the Zoom bombing occurred searching under topic and meeting ID.
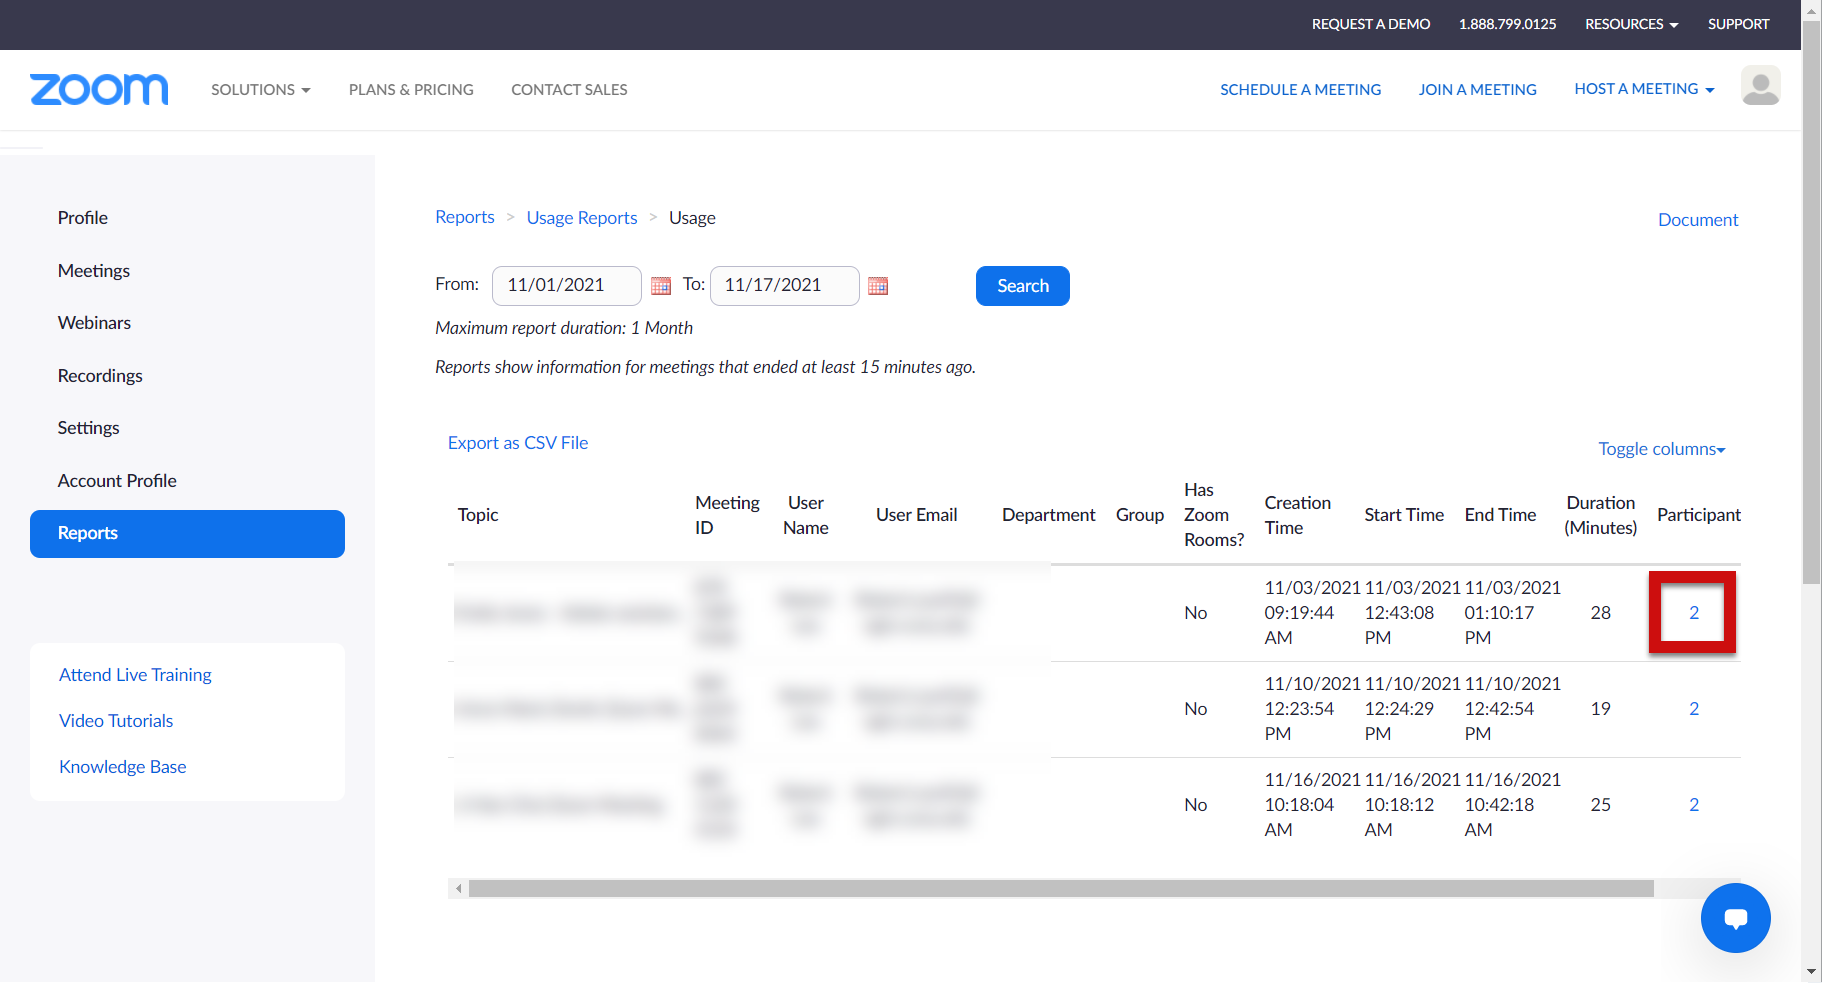
4. Click on the number in the Participants column. This brings up a list of participants with their start time, email address, and username.
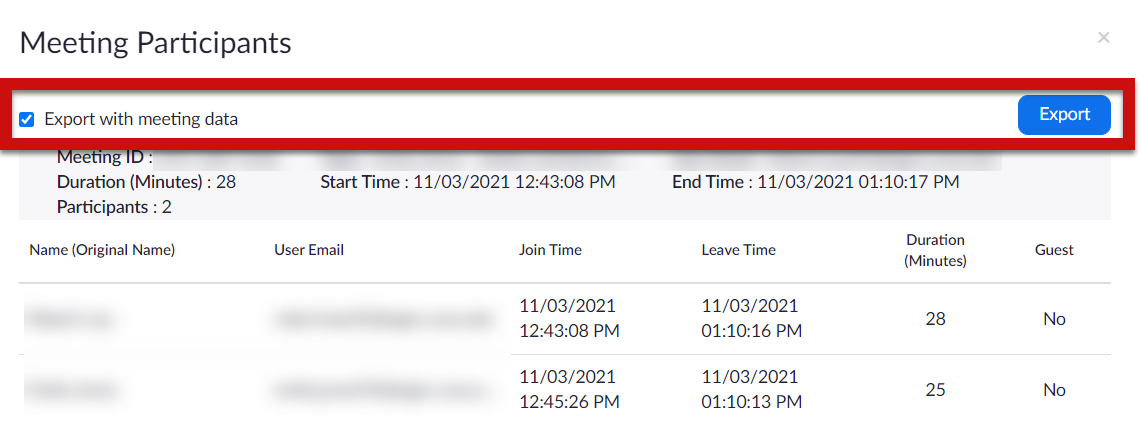
NOTE: Meeting Participants will show the CUNY login of the user in question if you have enabled “Require users to authenticate.”
5. Take a screenshot of the Zoom bomber’s information (including which user it was and when the incident occurred) or select “Export with Meeting data” then click “Export” to download the report as a CSV file.
6. Report this information to Office of Public Safety at security@qc.cuny.edu or 718-997-5912 and the Office of Vice President for Student Affairs at VPSA@qc.cuny.edu or call 718-997-5500. Be sure the report includes the documentation of the log of the incident, specifying the name of the “user” and the time the Zoom bombing occurred.
Should you require additional assistance, please contact the Center for Teaching and Learning at http://ctl.qc.cuny.edu/ or refer to the attached link at http://ctl.qc.cuny.edu/how-to-secure-your-zoom-sessions/