Zoom: Setting Up Registration for a Meeting
Overview
Scheduling a meeting that requires registration will allow participants register with their e-mail, name, other questions, and custom questions, allowing you to capture more information about your attendees. Once this is scheduled, you can manage your registrants, resend confirmation emails, and can also generate meeting registration reports if you want to download a list of people that registered.
This article covers the following topics. Links below will direct you to the Zoom support page:
Prerequisites
- Host user type must be Licensed
- The meeting you are enabling registration for cannot use your PMI and cannot be a No Fixed Time recurring meeting.
Enabling registration for a meeting
- Sign in to the Zoom web portal at cuny.zoom.us
- In the navigation menu, click Meetings.
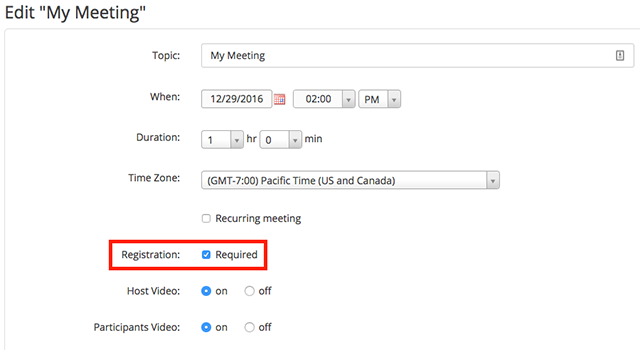
- Schedule a New Meeting or edit an existing meeting.
- In the Registration section, make sure to select the Required check box.
- After scheduling the meeting, the Registration and Branding tabs will appear.
- Manage attendees: Click View to see a list of people that have registered for the meeting. Clicking on the registrant name will provide addition info about that person.
Customizing registration options
After you schedule the meeting, you can customize registration options:
- Click the Registration tab.
- In the Registration Options section, click Edit.
- Customize these options:
Registration
- Automatic Approval: Anyone who signs up will receive information on how to join.
- Manual Approval: Anyone who signs up will need to be approved by the host on the meeting management page.
- Send an email to host when someone registers: Check this option if you want to receive an email when someone registers for your webinar. Attendees will receive an email when you approve their registration.
- Close registration after event date: Check this option if you want to prevent anyone from registering after the webinar date and projected end time. Attendees can still register on the event date and once the webinar starts, as long as it is before the projected end time of the webinar. For example, if you schedule a webinar for 9AM with a duration of 2 hours, the registration will close at 11AM.
Note: If you enable this setting and make your webinar available on-demand, people can use the original registration link to register for the on-demand webinar recording.
- Allow attendees to join from multiple devices: Check this option to allow webinar attendees to be able to join from multiple devices, such as computers and phones.
- Show social share buttons on the registration page: Provides buttons to share the registration page to Facebook, Twitter, LinkedIn, or email.
Questions
You can customize the question fields that appear in your registration page.
- Click the Questions tab.
- Check the Field(s) you would like to include on your registration page.
- (Optional) Check the Required box if you want to make that field required.
- Click Save All.
Note:
- Name and email address are always required.
- Some fields like Country/Region and State/Province will appear as dropdown menus for attendees.
Custom questions tab
- Click the Custom Questions tab to add questions to your registration page.
- Click New Question to add a question.
- Choose the type of question: Short answer or Single answer.
- Check whether the question is required.
- Enter the question.
- For single answer questions, enter the answer options.
- Click Create. Repeat the above steps to create more custom questions.
- Click Save All to save your customized registration.
Customizing branding
After you schedule the meeting, click the Branding tab to customize branding options for your registration page:
- Banner: Click Upload to add an image that appears at the top of your registration page.
- Logo: Click Upload to add an image that appears to the right of meeting topic on your registration page. The logo also appears in the email invitation.
- (Optional) Click Add Description to add alt text to the image. The description isn't visually displayed on the screen but helps people with visual impairments to access and understand the image.
Original Article can be found here: https://support.zoom.us/hc/en-us/articles/211579443-Setting-up-registration-for-a-meeting