1 - Getting Started with M365 Outlook after the Email Cutover (Windows)
After the email cutover you will need to take some steps to properly set up your email client.
You can follow these steps using Microsoft 365/Office 365 or Office 2019. Please note that you may see some graphical differences between those programs, but the steps will remain the same.
Using the Mac Outlook App? [click here]
Using the Outlook Web Application (OWA)? [click here]
Using an iOS (Apple) Device? [click here]
Using an Android Device? [click here]
STEP ONE: CREATING A NEW PROFILE FOR YOUR EMAIL ACCOUNTS
1. Open the M365 Outlook Client
![M365 Outlook Icon for Windows](https://attachment.freshservice.com/inline/attachment?token=eyJ0eXAiOiJKV1QiLCJhbGciOiJIUzI1NiJ9.eyJpZCI6MTUwMjA1MTczMjgsImRvbWFpbiI6InFjY3VueS5mcmVzaHNlcnZpY2UuY29tIiwidHlwZSI6MX0.cZ2HCLeTd8Yjs1UhiBHLLYAsXBZsYzQn0OsVUExT7Bw)
2. Click on File
![Click on File](https://attachment.freshservice.com/inline/attachment?token=eyJ0eXAiOiJKV1QiLCJhbGciOiJIUzI1NiJ9.eyJpZCI6MTUwMjA1MTczMzAsImRvbWFpbiI6InFjY3VueS5mcmVzaHNlcnZpY2UuY29tIiwidHlwZSI6MX0.tAX8vjegH-y_h9C3e5_Phw1X52DT21JjFibtPamzkJE)
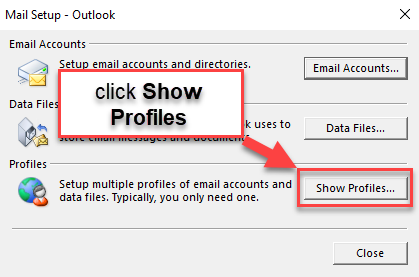
3. Click on the Account Settings Tab, then click on Manage Profiles
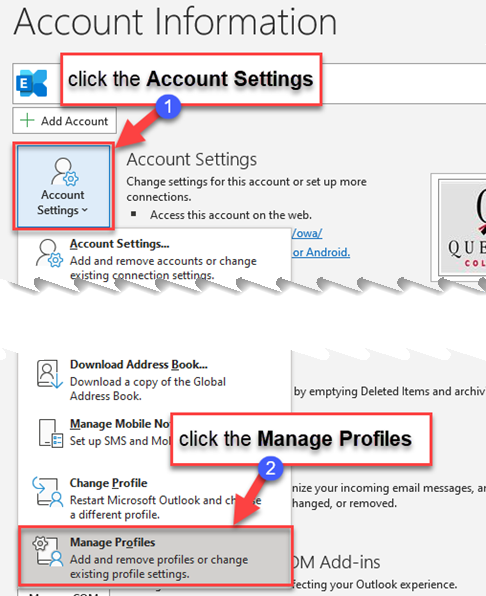
![Click on the Account Settings Tab, then click on Manage Profiles](https://attachment.freshservice.com/inline/attachment?token=eyJ0eXAiOiJKV1QiLCJhbGciOiJIUzI1NiJ9.eyJpZCI6MTUwMjA1MTczNDMsImRvbWFpbiI6InFjY3VueS5mcmVzaHNlcnZpY2UuY29tIiwidHlwZSI6MX0.FffGRiLDYEMOZ8OFJJth9b2l3veiu4L4-AzaiCaPs-I)
4. Click to select the account you want to remove, then click Remove
![Click to select the account you want to remove, then click Remove](https://attachment.freshservice.com/inline/attachment?token=eyJ0eXAiOiJKV1QiLCJhbGciOiJIUzI1NiJ9.eyJpZCI6MTUwMjA1MTczMjksImRvbWFpbiI6InFjY3VueS5mcmVzaHNlcnZpY2UuY29tIiwidHlwZSI6MX0.0LeG_Stf-NcYneUCTQoOXWtF6OjK7Q0sfktSoAE8g4s)
5. A pop up will show on screen, click Yes
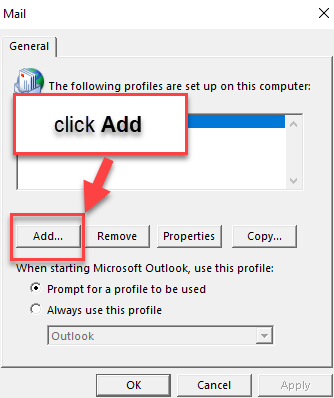
![A pop up will show on screen, click Yes](https://attachment.freshservice.com/inline/attachment?token=eyJ0eXAiOiJKV1QiLCJhbGciOiJIUzI1NiJ9.eyJpZCI6MTUwMjA1MTczMzIsImRvbWFpbiI6InFjY3VueS5mcmVzaHNlcnZpY2UuY29tIiwidHlwZSI6MX0.-YlqjHgKI5rh23HfOnyWBSrgXqrRoT6oN3Iu_8jQSdU)
6. Add a Profile Name
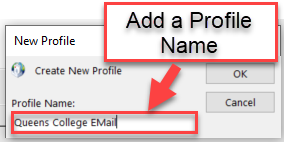
![Add a Profile Name](https://attachment.freshservice.com/inline/attachment?token=eyJ0eXAiOiJKV1QiLCJhbGciOiJIUzI1NiJ9.eyJpZCI6MTUwMjA1MTczMzEsImRvbWFpbiI6InFjY3VueS5mcmVzaHNlcnZpY2UuY29tIiwidHlwZSI6MX0.c9AOmyi4BOeuyGtT9x8Bm7AnkYuQetYs-J7l1DQlLjU)
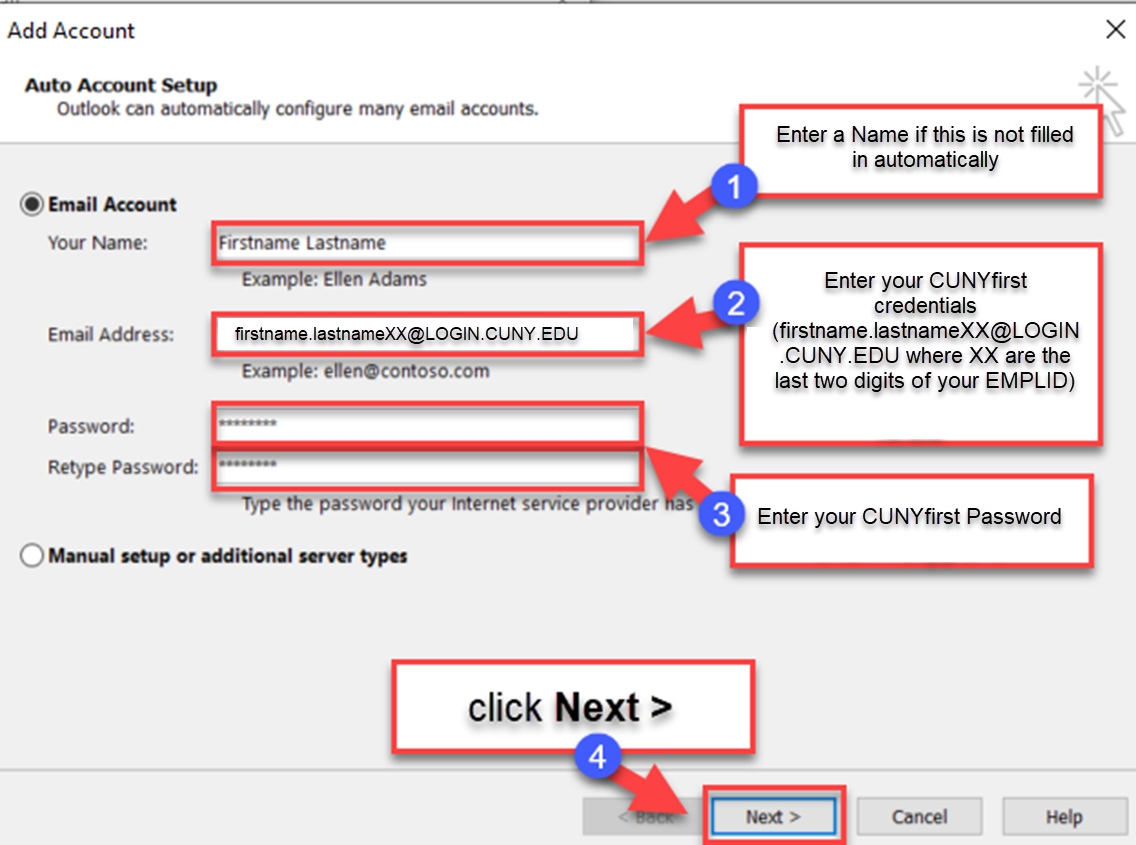
7. Enter a name if it is nor filled in automatically, then Enter your CUNYfirst credentials (firstname.lastnameXX@LOGIN.CUNY.EDU where XX are the last two digits of your EMPLID), enter your CUNYfirst password, then click Next >
![](https://attachment.freshservice.com/inline/attachment?token=eyJ0eXAiOiJKV1QiLCJhbGciOiJIUzI1NiJ9.eyJpZCI6MTUwMjA5NzQzOTcsImRvbWFpbiI6InFjY3VueS5mcmVzaHNlcnZpY2UuY29tIiwidHlwZSI6MX0.1DRg1v_wL3IE7bxm2eUCgjSCccQyBPpRnPQVzkPt9n4)
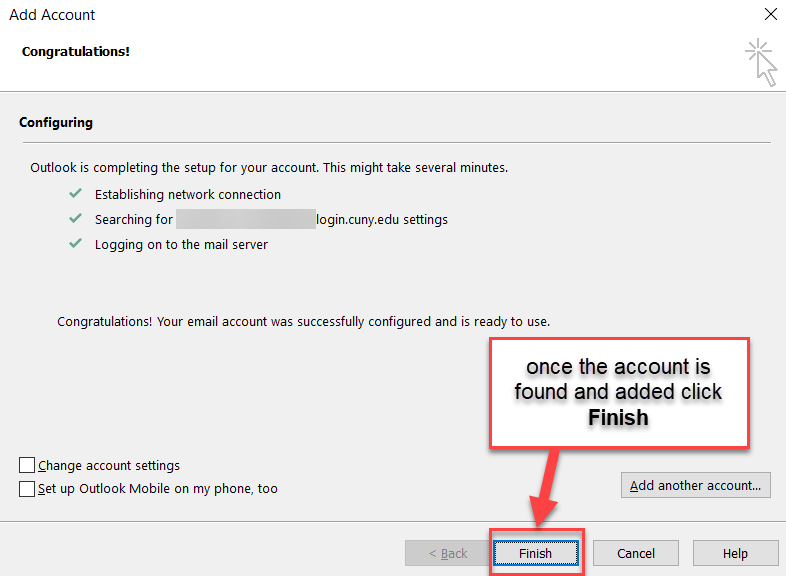
8. Your account will be searched for on the Microsoft Cloud
![](https://attachment.freshservice.com/inline/attachment?token=eyJ0eXAiOiJKV1QiLCJhbGciOiJIUzI1NiJ9.eyJpZCI6MTUwMjA5NzQzOTQsImRvbWFpbiI6InFjY3VueS5mcmVzaHNlcnZpY2UuY29tIiwidHlwZSI6MX0.k73UBVu5PqW7peu0o_fcz9Vqv0R2yqrECeBZ0yuclMc)
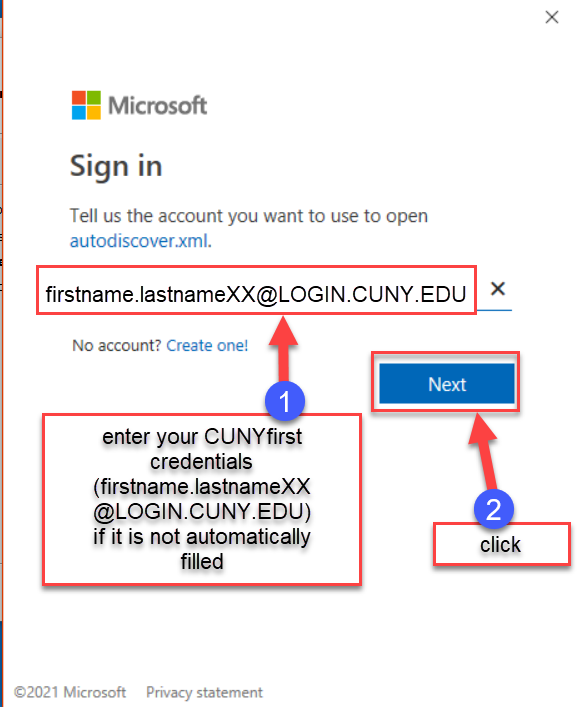
9. Once found, a Microsoft pop up will you to sign in. Enter your CUNYfirst credentials (firstname.lastnameXX@LOGIN.CUNY.EDU) if it is not already filled in, then click Next
![](https://attachment.freshservice.com/inline/attachment?token=eyJ0eXAiOiJKV1QiLCJhbGciOiJIUzI1NiJ9.eyJpZCI6MTUwMjA5NzQzOTYsImRvbWFpbiI6InFjY3VueS5mcmVzaHNlcnZpY2UuY29tIiwidHlwZSI6MX0.Z4i8qup3K6Y3Y6hD49PclewnvBVcTgBe9QJptylX5yg)
10. Once the Account is found and added, click Finish
![](https://attachment.freshservice.com/inline/attachment?token=eyJ0eXAiOiJKV1QiLCJhbGciOiJIUzI1NiJ9.eyJpZCI6MTUwMjA5NzQzOTUsImRvbWFpbiI6InFjY3VueS5mcmVzaHNlcnZpY2UuY29tIiwidHlwZSI6MX0.TZL4z9OrmLpwoErQiCaU1Lp0QT9_nGKpvzY503f1NPg)
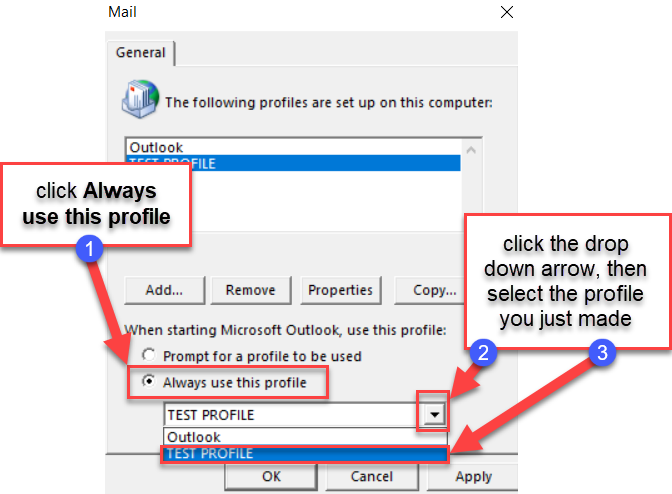
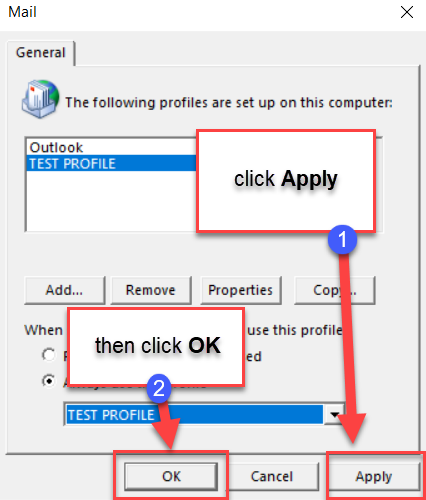
11. Click Always use the profile then click the drop down arrow and select the profile you just made
![Click Always use the profile then click the drop down arrow and select the profile you just made](https://attachment.freshservice.com/inline/attachment?token=eyJ0eXAiOiJKV1QiLCJhbGciOiJIUzI1NiJ9.eyJpZCI6MTUwMjA1MTczNDUsImRvbWFpbiI6InFjY3VueS5mcmVzaHNlcnZpY2UuY29tIiwidHlwZSI6MX0.xvCBsM3DjAvzTL0FV5LZNUq4U8oyQKJxg4UleqfKN-c)
12. Click Apply, then click OK
![Click Apply, then click OK](https://attachment.freshservice.com/inline/attachment?token=eyJ0eXAiOiJKV1QiLCJhbGciOiJIUzI1NiJ9.eyJpZCI6MTUwMjA1MTczMzQsImRvbWFpbiI6InFjY3VueS5mcmVzaHNlcnZpY2UuY29tIiwidHlwZSI6MX0.WD5OoTS_F7XvPAVU4qqhb1yhrmh7fDDdBKV6KzzsjUw)
13. Restart your Outlook client. You may notice longer than usual start up times as the app syncs with the server.
STEP TWO: ADDING YOUR OLD QC EMAIL ACCOUNT TO YOUR NEW PROFILE
14. Open the M365 Outlook Client
![M365 Outlook Icon for Windows](https://attachment.freshservice.com/inline/attachment?token=eyJ0eXAiOiJKV1QiLCJhbGciOiJIUzI1NiJ9.eyJpZCI6MTUwMjA1MTczMzUsImRvbWFpbiI6InFjY3VueS5mcmVzaHNlcnZpY2UuY29tIiwidHlwZSI6MX0.i8BcFV8X5UsnHCRopVFS_d4fZJtvGtEzJQjo4Ly_LOk)
15. Click on File
![Click on File](https://attachment.freshservice.com/inline/attachment?token=eyJ0eXAiOiJKV1QiLCJhbGciOiJIUzI1NiJ9.eyJpZCI6MTUwMjA1MTczMzgsImRvbWFpbiI6InFjY3VueS5mcmVzaHNlcnZpY2UuY29tIiwidHlwZSI6MX0.jt1BReUsXI3Zx_EvDJRUfNTDXpeznGnNhDJN69dbB3Q)
16. then click Add Account
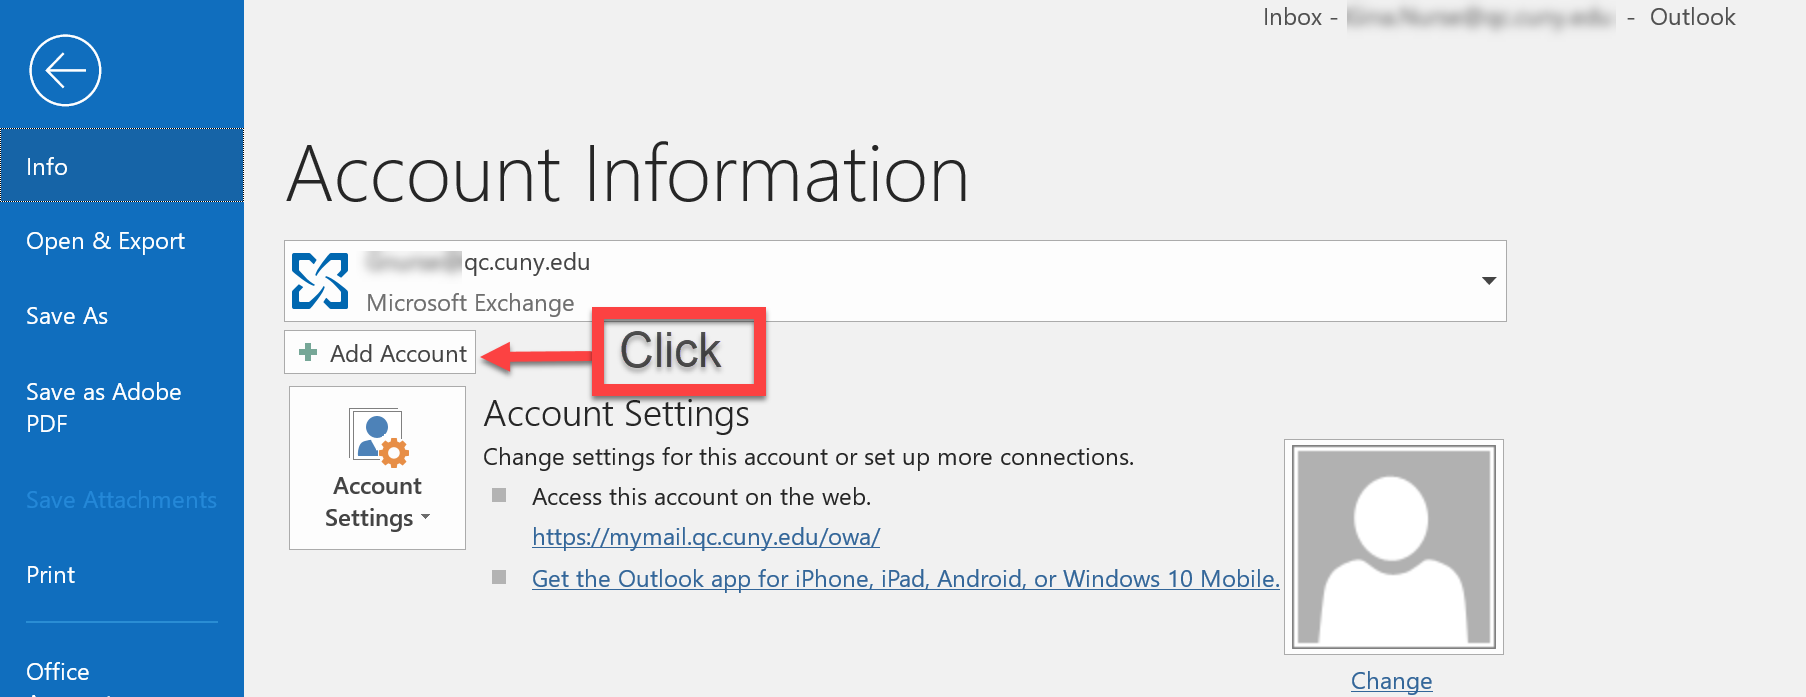
![then click Add Account](https://attachment.freshservice.com/inline/attachment?token=eyJ0eXAiOiJKV1QiLCJhbGciOiJIUzI1NiJ9.eyJpZCI6MTUwMjA1MTczNDYsImRvbWFpbiI6InFjY3VueS5mcmVzaHNlcnZpY2UuY29tIiwidHlwZSI6MX0.pV3akk_0vS_s3tmxJscms21ZFDjlykx3neo8GUWnwSQ)
17. Enter your old QC email address (firstname.lastname@legacymail.qc.cuny.edu), then click Connect
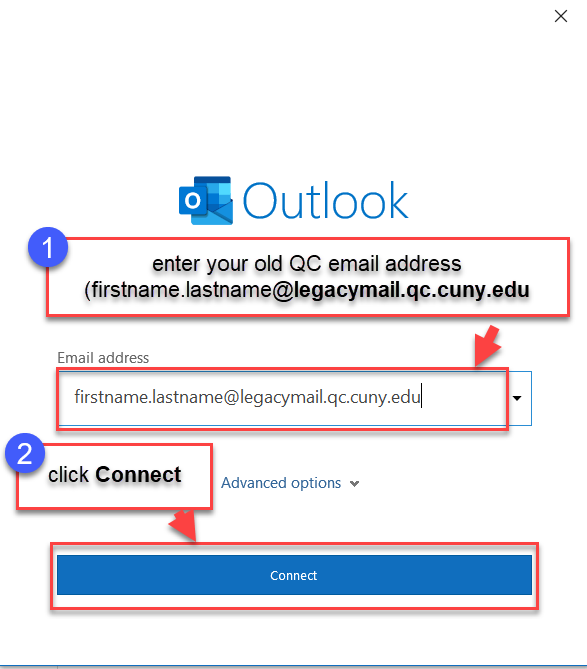
![Enter your old QC email address (firstname.lastname@legacymail.qc.cuny.edu), then click Connect](https://attachment.freshservice.com/inline/attachment?token=eyJ0eXAiOiJKV1QiLCJhbGciOiJIUzI1NiJ9.eyJpZCI6MTUwMjA1MTczMzcsImRvbWFpbiI6InFjY3VueS5mcmVzaHNlcnZpY2UuY29tIiwidHlwZSI6MX0.18piO4U7aif8p1QZ2omgMI4T1Hr-pGXCtzSdWHr7XGk)
18. Select Exchange on the next window
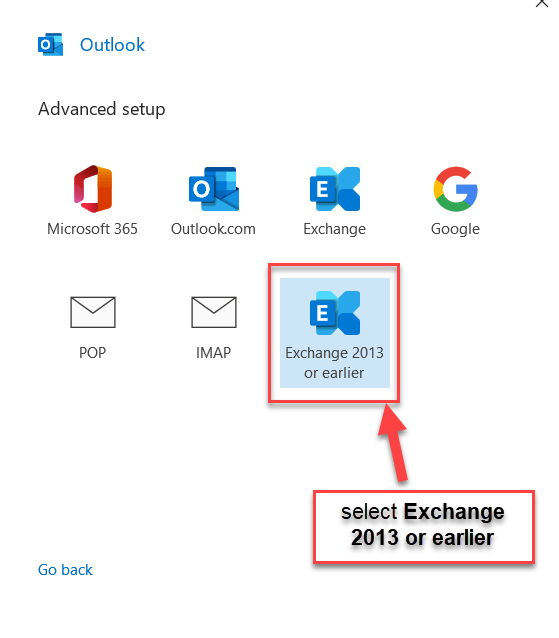
![](https://attachment.freshservice.com/inline/attachment?token=eyJ0eXAiOiJKV1QiLCJhbGciOiJIUzI1NiJ9.eyJpZCI6MTUwMjA5NDEyNTgsImRvbWFpbiI6InFjY3VueS5mcmVzaHNlcnZpY2UuY29tIiwidHlwZSI6MX0.dzyftgjjCnQ2PRmyzeolvYpYQ0nwNdNvWLJR9eGis_c)
19. Wait for the Account to be made ready
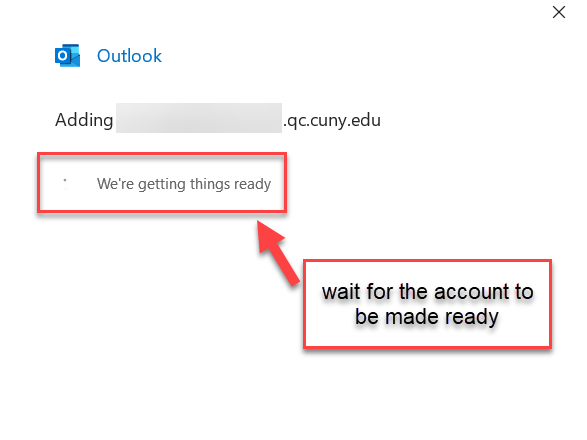
![Wait for the Account to be made ready](https://attachment.freshservice.com/inline/attachment?token=eyJ0eXAiOiJKV1QiLCJhbGciOiJIUzI1NiJ9.eyJpZCI6MTUwMjA1MTczNDEsImRvbWFpbiI6InFjY3VueS5mcmVzaHNlcnZpY2UuY29tIiwidHlwZSI6MX0.dj20kWwCrcGk5ONDtQqaY7i2SkDXVcL9xr9j2CUx6p4)
20. If you get a popup Security Alert, click Yes
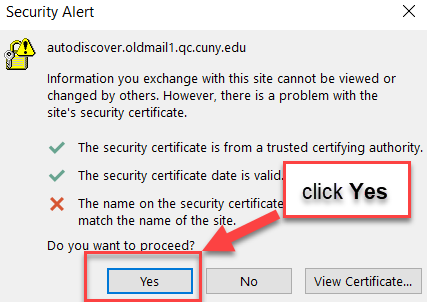
![If you get a popup Security Alert, click Yes](https://attachment.freshservice.com/inline/attachment?token=eyJ0eXAiOiJKV1QiLCJhbGciOiJIUzI1NiJ9.eyJpZCI6MTUwMjA1MTczMzksImRvbWFpbiI6InFjY3VueS5mcmVzaHNlcnZpY2UuY29tIiwidHlwZSI6MX0.f5RkOmWnzFk_cdU9bWatiM6MDyoDkX-juoTKsfjovBg)
21. On the next pop up, click More choices, then click Use a different account
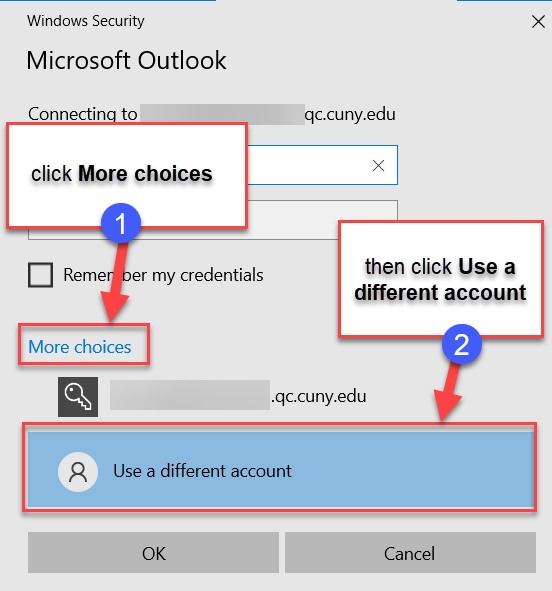
![On the next pop up, click More choices, then click Use a different account](https://attachment.freshservice.com/inline/attachment?token=eyJ0eXAiOiJKV1QiLCJhbGciOiJIUzI1NiJ9.eyJpZCI6MTUwMjA5Nzc5MzUsImRvbWFpbiI6InFjY3VueS5mcmVzaHNlcnZpY2UuY29tIiwidHlwZSI6MX0.Il7IjWxx2UZGwcxwLf9E0jeZSDhFhXoQbqUtnG8VhRw)
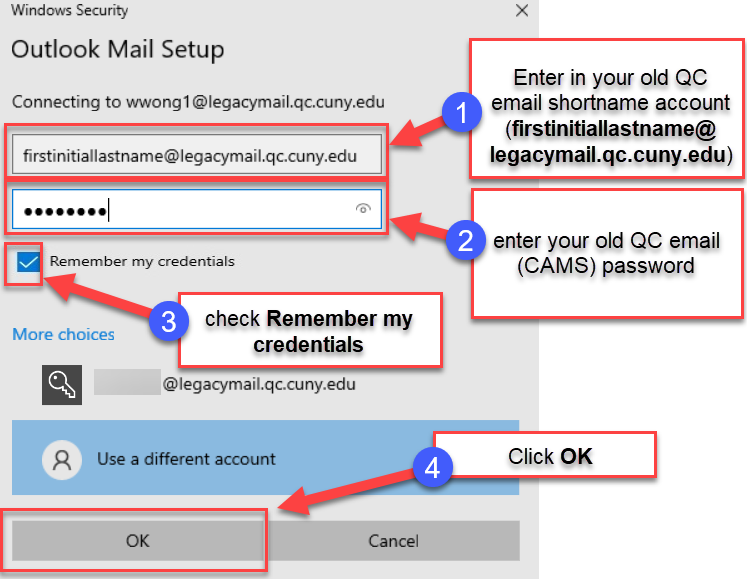
22. Enter in your old QC email shortname account (firstinitiallastname@legacymail.qc.cuny.edu) in the username field, enter your old QC email password in the next field, check Remember my credentials, then click OK
![Enter in your old QC email shortname account (firstinitiallastname@legacymail.qc.cuny.edu) in the username field, enter your old QC email password in the next field, check Remember my credentials, then click OK](https://attachment.freshservice.com/inline/attachment?token=eyJ0eXAiOiJKV1QiLCJhbGciOiJIUzI1NiJ9.eyJpZCI6MTUwMjA5Nzc5MzYsImRvbWFpbiI6InFjY3VueS5mcmVzaHNlcnZpY2UuY29tIiwidHlwZSI6MX0.hxW0Q18dE463Nw-WSucsxYwrCgTVhHNLpgDlZMktVk4)
23. Restart your Outlook client. You may notice longer than usual start up times as the app syncs with the server. If you are prompted to authenticate your account (Windows Security pop up window) please repeat steps 21 and 22 on the pop up.
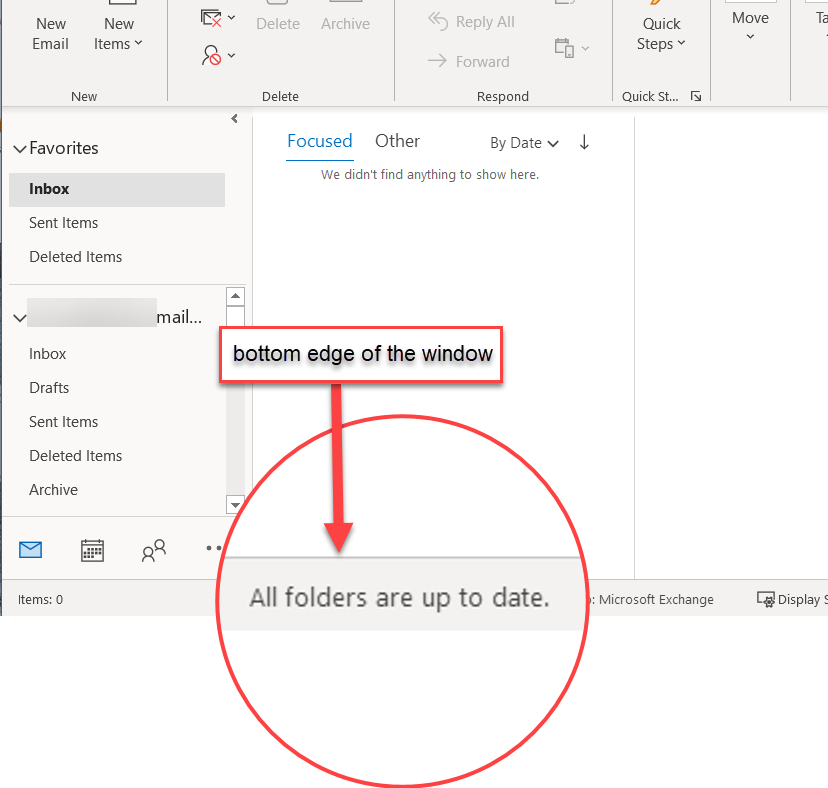
24. Look at the bottom of the Outlook window, when you see All folders are up to date. your mail box is complete synced. This can take a few hours, the process will continue as long as the Outlook app is connected to the internet and open (even in the background). So please make sure the status is All folders are up to date and no other words appear before exporting your back up file.
![Look at the bottom of the Outlook window, when you see All folders are up to date. you can move on to the next steps. This can take a few hours, the process will continue as long as the Outlook app is connected to the internet and open (even in the background).](https://attachment.freshservice.com/inline/attachment?token=eyJ0eXAiOiJKV1QiLCJhbGciOiJIUzI1NiJ9.eyJpZCI6MTUwMjA4OTU2OTIsImRvbWFpbiI6InFjY3VueS5mcmVzaHNlcnZpY2UuY29tIiwidHlwZSI6MX0.JA6dkhjwHEY0u794mtFR5pN9lEXtNaIBxXUAYE37VCA)
Congratulations! Your accounts are now ready to be used.
Now you can create an export backup file of your old mailbox to merge into your new account. Find out how by [clicking here]